A Quick Tour
Goal
This tutorial will expand on the First Run tutorial by taking a quick tour around some of the features of buildbot that are hinted at in the comments in the sample configuration. We will simply change parts of the default configuration and explain the activated features.
As a part of this tutorial, we will make buildbot do a few actual builds.
- This section will teach you how to:
- make simple configuration changes and activate them
- deal with configuration errors
- force builds
- enable and control the IRC bot
- enable ssh debugging
Setting Project Name and URL
Let’s start simple by looking at where you would customize the buildbot’s project name and URL.
We continue where we left off in the First Run tutorial.
Open a new terminal, and first enter the same sandbox you created before (where $EDITOR is your editor of choice like vim, gedit, or emacs):
cd
cd tmp/buildbot
source sandbox/bin/activate
$EDITOR master/master.cfg
Now, look for the section marked PROJECT IDENTITY which reads:
####### PROJECT IDENTITY

# the 'title' string will appear at the top of this buildbot
# installation's html.WebStatus home page (linked to the
# 'titleURL') and is embedded in the title of the waterfall HTML page.

c['title'] = "Pyflakes"
c['titleURL'] = "http://divmod.org/trac/wiki/DivmodPyflakes"
If you want, you can change either of these links to anything you want to see what happens when you change them. After making a change go into the terminal and type:
buildbot reconfig master
You will see a handful of lines of output from the master log, much like this:
2009-08-01 13:38:21+0200 [-] loading configuration from /home/thomas/dev/ext/buildbot/sandbox/master/master.cfg
2009-08-01 13:38:21+0200 [-] builder buildbot-full is unchanged
2009-08-01 13:38:21+0200 [-] removing IStatusReceiver <WebStatus on port tcp:8010 at 0x11a5290>
2009-08-01 13:38:21+0200 [-] configuration update started
2009-08-01 13:38:21+0200 [-] (Port 8010 Closed)
2009-08-01 13:38:21+0200 [-] Stopping factory <twisted.web.server.Site instance at 0x11a5518>
2009-08-01 13:38:21+0200 [-] adding IStatusReceiver <WebStatus on port tcp:8010 at 0x14f9050>
2009-08-01 13:38:21+0200 [-] twisted.web.server.Site starting on 8010
2009-08-01 13:38:21+0200 [-] Starting factory <twisted.web.server.Site instance at 0x14f90e0>
2009-08-01 13:38:21+0200 [-] WebStatus using (/home/thomas/dev/ext/buildbot/sandbox/master/public_html)
2009-08-01 13:38:21+0200 [-] adding 0 new schedulers, removed 0
2009-08-01 13:38:21+0200 [-] adding 0 new changesources, removing 0
2009-08-01 13:38:21+0200 [-] configuration update complete

Reconfiguration appears to have completed successfully.
The important lines are the ones telling you that it is loading the new configuration at the top, and the one at the bottom saying that the update is complete.
Now, if you go back to the waterfall page, you will see that the project’s name is whatever you may have changed it to and when you click on the the URL of the project name at the bottom of the page it should take you to the link you put in the configuration.
Configuration Errors
It is very common to make a mistake when configuring buildbot, so you might as well see now what happens in that case and what you can do to fix the error.
Open up the config again and introduce a syntax error by removing the first single quote in the two lines you changed, so they read:
c[title'] = "Pyflakes"
c['titleURL'] = "http://divmod.org/trac/wiki/DivmodPyflakes"
This creates a Python SyntaxError. Now go ahead and reconfig the buildmaster:
buildbot reconfig master
This time, the output looks like:
2009-08-01 13:52:23+0200 [-] loading configuration from /home/thomas/dev/ext/buildbot/sandbox/master/master.cfg
2009-08-01 13:52:23+0200 [-] error while parsing config file
2009-08-01 13:52:23+0200 [-] error during loadConfig
2009-08-01 13:52:23+0200 [-] Unhandled Error
      Traceback (most recent call last):
        File "/home/thomas/dev/ext/buildbot/sandbox/lib/python2.6/site-packages/Twisted-8.2.0-py2.6-linux-x86_64.egg/twisted/application/app.py", line 348, in runReactorWithLogging
          reactor.run()
        File "/home/thomas/dev/ext/buildbot/sandbox/lib/python2.6/site-packages/Twisted-8.2.0-py2.6-linux-x86_64.egg/twisted/internet/base.py", line 1128, in run
          self.mainLoop()
        File "/home/thomas/dev/ext/buildbot/sandbox/lib/python2.6/site-packages/Twisted-8.2.0-py2.6-linux-x86_64.egg/twisted/internet/base.py", line 1137, in mainLoop
          self.runUntilCurrent()
        File "/home/thomas/dev/ext/buildbot/sandbox/lib/python2.6/site-packages/Twisted-8.2.0-py2.6-linux-x86_64.egg/twisted/internet/base.py", line 757, in runUntilCurrent
            call.func(*call.args, **call.kw)
        --- <exception caught here> ---
          File "/home/thomas/dev/ext/buildbot/src/buildbot/master.py", line 511, in loadTheConfigFile
            self.loadConfig(f)
          File "/home/thomas/dev/ext/buildbot/src/buildbot/master.py", line 529, in loadConfig
            exec f in localDict
        exceptions.SyntaxError: EOL while scanning string literal (master.cfg, line 191)

2009-08-01 13:52:23+0200 [-] The new config file is unusable, so I'll ignore it.
2009-08-01 13:52:23+0200 [-] I will keep using the previous config file instead.

Reconfiguration failed. Please inspect the master.cfg file for errors,
correct them, then try 'buildbot reconfig' again.
This time, it’s clear that there was a mistake. in the configuration. Luckily, the buildbot master will ignore the wrong configuration and keep running with the previous configuration.
The message is clear enough, so open the configuration again, fix the error, and reconfig the master.
Note that if you are not using 0.8.4 you might experience an error during reconfig with clean configs, this is due to http://trac.buildbot.net/ticket/1757 which if fixed and will be in the 0.8.4 package. If you come across this, just do start & stop for now to get your buildbot instance updated:
buildbot stop master && buildbot start master
Your First Build
By now you’re probably thinking: “All this time spent and still not done a single build ? What was the name of this project again ?”
On the waterfall. page, click on the runtests link, and scroll down. You will see some new options that allow you to force a build:
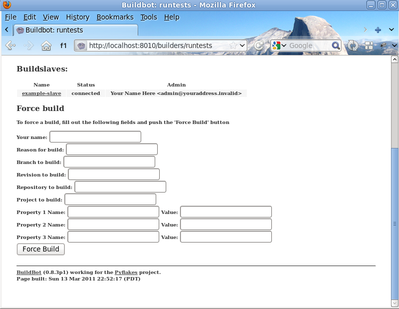
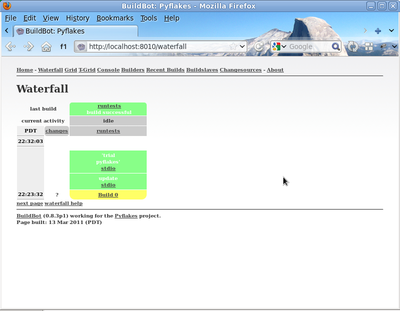
Type in your name and a reason, then click Force Build. After that, click on view in waterfall.
You will now see:
Enabling the IRC Bot
Buildbot includes an IRC bot that you can tell to join a channel and control to report on the status of buildbot.
First, start an IRC client of your choice, connect to irc.freenode.org and join an empty channel. In this example we will use #buildbot-test, so go join that channel. (Note: please do not join the main buildbot channel!)
Edit the config and look for the STATUS TARGETS section that you changed before to be able to force the build.
Enter these lines below the WebStatus line in master.cfg:
c['status'].append(html.WebStatus(http_port=8010, authz=authz_cfg))

from buildbot.status import words
c['status'].append(words.IRC(host="irc.freenode.org", nick="bbtest",
                             channels=["#buildbot-test"]))
Reconfigure the build master then do:
cat master/twistd.log | grep IRC
The log output should contain a line like this:
2009-08-01 15:35:20+0200 [-] adding IStatusReceiver <buildbot.status.words.IRC instance at 0x300d290>
You should see the bot now joining in your IRC client. Type:
bbtest: commands
to get a list of the commands the bot supports.
Let’s tell the bot to notify certain events, to learn which EVENTS we can notify on do:
bbtest: help notify
Now let’s set some event notifications:
bbtest: notify on started
bbtest: notify on finished
bbtest: notify on failure
The bot should have responded to each of the commands:
<@lsblakk> bbtest: notify on started
<bbtest> The following events are being notified: ['started']
<@lsblakk> bbtest: notify on finished
<bbtest> The following events are being notified: ['started', 'finished']
<@lsblakk> bbtest: notify on failure
<bbtest> The following events are being notified: ['started', 'failure', 'finished']
Now, go back to the web interface and force another build.
Notice how the bot tells you about the start and finish of this build:
< bbtest> build #1 of runtests started, including []
< bbtest> build #1 of runtests is complete: Success [build successful]  Build details are at http://localhost:8010/builders/runtests/builds/1
You can also use the bot to force a build:
bbtest: force build runtests test build
But to allow this, you’ll need to have allowForce in the IRC configuration:
c['status'].append(words.IRC(host="irc.freenode.org", nick="bbtest",
                             allowForce=True,
                             channels=["#buildbot-test"]))
This time, the bot is giving you more output, as it’s specifically responding to your direct request to force a build, and explicitly tells you when the build finishes:
<@lsblakk> bbtest: force build runtests test build
< bbtest> build #2 of runtests started, including []
< bbtest> build forced [ETA 0 seconds]
< bbtest> I'll give a shout when the build finishes
< bbtest> build #2 of runtests is complete: Success [build successful]  Build details are at http://localhost:8010/builders/runtests/builds/2
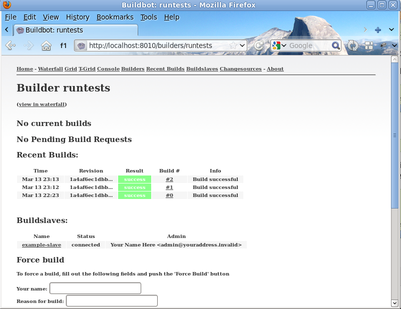
You can also see the new builds in the web interface.
Debugging with Manhole
You can do some debugging by using manhole, an interactive Python shell. It exposes full access to the buildmaster’s account (including the ability to modify and delete files), so it should not be enabled with a weak or easily guessable password.
To use this you will need to install an additional package or two to your virtualenv:
# make sure your sandbox is activated so this is installed in your virtualenv
pip install pycrypto
pip install pyasn1
In your master.cfg find:
c = BuildmasterConfig = {}
Insert the following to enable debugging mode with manhole:
####### DEBUGGING
from buildbot import manhole
c['manhole'] = manhole.PasswordManhole("tcp:1234:interface=127.0.0.1","admin","passwd")
Now you can ssh into the master and get an interactive python shell:
ssh -p1234 admin@127.0.0.1
# enter passwd at prompt
If you wanted to check which slaves are connected and what builders those slaves are assigned to you could do:
>>> master.botmaster.slaves
{'example-slave': <BuildSlave 'example-slave', current builders: runtests>}
Objects can be explored in more depth using dir(x) or the helper function show(x).